- 关于envoy
- envoy配置文件
- 安装与启动
- 增加管理
- 拓展HTTP_HEADERS
- X-Forwarded-For
- X-Real-IP
- X-Request-ID
- 看下bookinfo相关的header
- 参考
关于envoy
Envoy是云原生数据平面的重要构成组件,如Istio、OSM。因为它的配置文件的修改后,可以热更新,无需像nginx/haproxy那样需要reload配置文件,因此受到了微服务的热捧。nginx为适应微服务的场景,推出了nsm,但是一段时间后还是终止。因此,envoy已经成为了微服务事实上的数据平面组件。
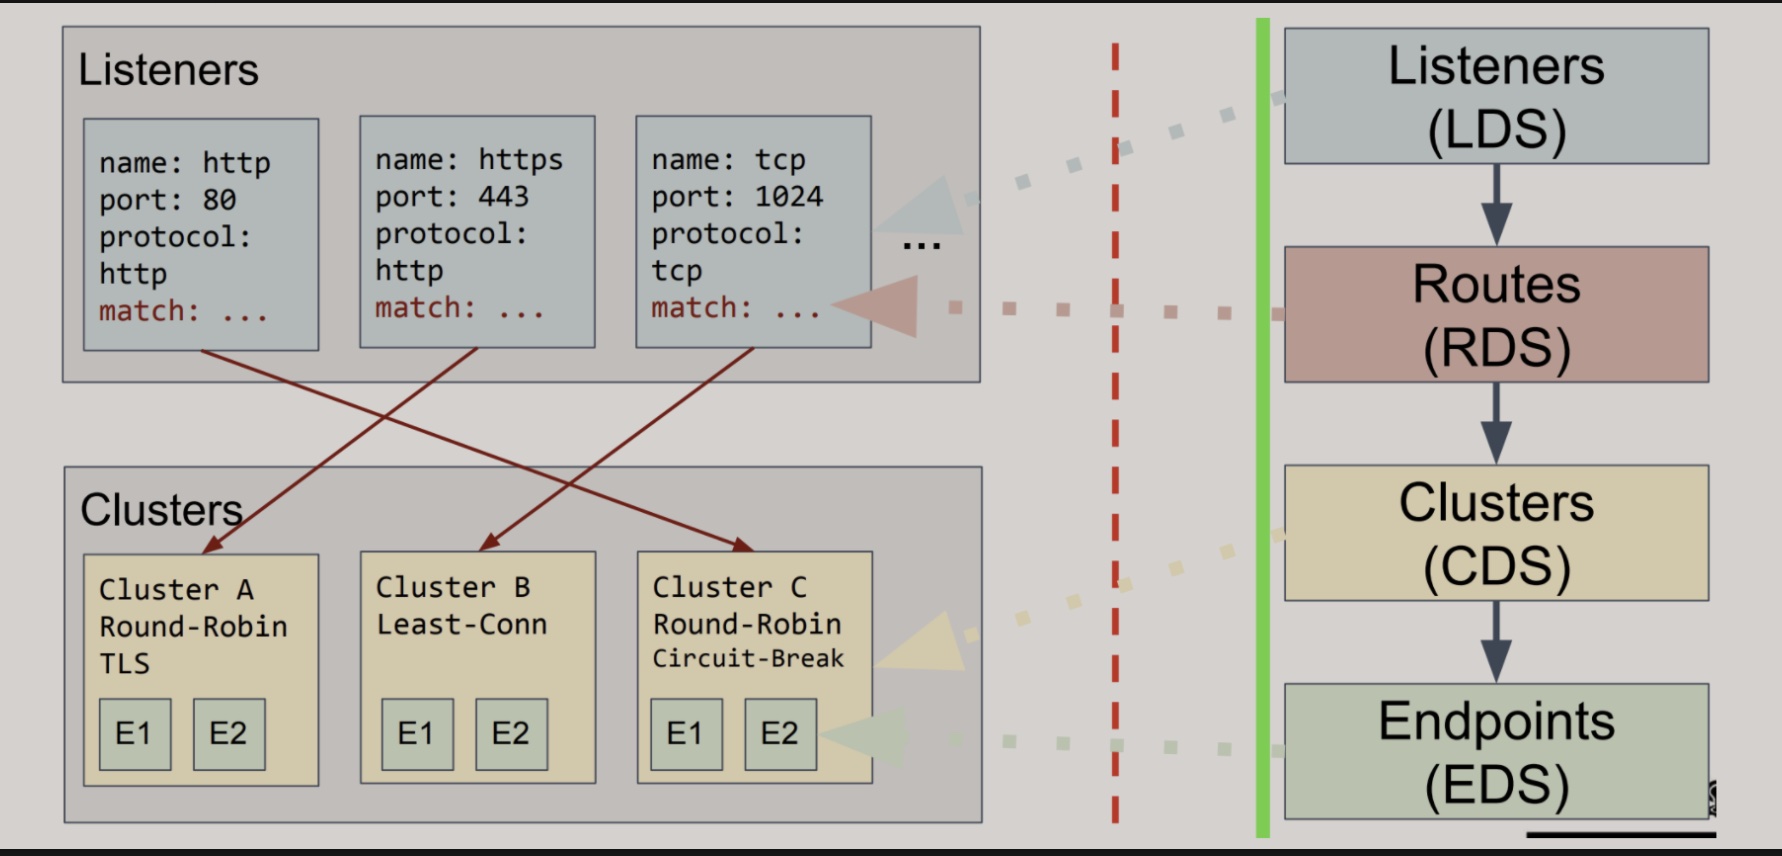
envoy配置文件
xds是一类API接口的统称,即:
lds: listerner监听端口,即服务启动后,会在本地启动的端口;
rds: 路由,即http路由匹配;
cds: cluster,类似于k8s中的服务Service;
eds: endpoint,即k8s中的endpoint,真实的工作单元;
安装与启动
brew install envoy
envoy启动需要使用配置文件;
static_resources:
  listeners:
  - name: listener_0
    address:
      socket_address: { address: 0.0.0.0, port_value: 10000 }

    filter_chains:
    - filters:
      - name: envoy.http_connection_manager
        config:
          stat_prefix: ingress_http
          route_config:
            name: local_route
            virtual_hosts:
            - name: local_service
              domains: ["*"]
              routes:
              - match: { prefix: "/" }
                route: { host_rewrite: www.baidu.com, cluster: service_baidu }
          http_filters:
          - name: envoy.router

  clusters:
  - name: service_baidu
    connect_timeout: 0.25s
    type: LOGICAL_DNS
    dns_lookup_family: V4_ONLY
    lb_policy: ROUND_ROBIN
    hosts: [{ socket_address: { address: www.baidu.com, port_value: 443 }}]
    tls_context: { sni: baidu.com }
sudo envoy --config-path envoy.yaml
这样就会可以把envoy跑起来,此时在本地就可以启动一个代理,端口10000,重定向到www.baidu.com

增加管理
admin:
  access_log_path: /tmp/admin_access.log
  address:
    socket_address: { address: 0.0.0.0, port_value: 9901 }

用docker跑起来
docker run --name=envoy-with-admin -d \
    -p 9901:9901 \
    -p 10000:10000 \
    -v $(pwd)/envoy.yaml:/etc/envoy/envoy.yaml \
    envoyproxy/envoy:latest
拓展HTTP_HEADERS
思考:经常看到需要使用http透传,或是说使用客户端IP,这类问题要怎么解决?
本质上就是带上HTTP Header
常见的Header:
User-Agent
Content-Type
Host
X-Forwarded-For
X-Forwarded-For 是一个 HTTP 扩展头部,用来表示 HTTP 请求端真实 IP。如果一个 HTTP 请求到达服务器之前,经过了三个代理 Proxy1、Proxy2、Proxy3,IP 分别为 IP1、IP2、IP3,用户真实 IP 为 IP0,那么按照 XFF 标准,服务端最终会收到以下信息:X-Forwarded-For: IP0, IP1, IP2;Proxy3 直连服务器,它会给 XFF 追加 IP2,表示它是在帮 Proxy2 转发请求。列表中并没有 IP3,IP3 可以在服务端通过 Remote Address 字段获得。我们知道 HTTP 连接基于 TCP 连接,HTTP 协议中没有 IP 的概念,Remote Address 来自 TCP 连接,表示与服务端建立 TCP 连接的设备 IP,在这个例子里就是 IP3。
经过nginx代理后,配置加上该Header
# Pass the original X-Forwarded-For
proxy_set_header X-Forwarded-For        $the_real_ip;
proxy_set_header X-Forwarded-Host       $best_http_host;
proxy_set_header X-Forwarded-Port       $pass_port;
proxy_set_header X-Forwarded-Proto      $pass_access_scheme;
该Url经过nginx访问到达后端后,该请求的头部已经有了这些Header,可以通过抓包看到。如果想通过直接访问的形式看到,可以借助image,如:
kubectl -n realip run myservice --image=containous/whoami
kubectl -n realip expose deploy myservice --type=NodePort --port=80

curl 10.233.64.200
Hostname: myservice-fc55d766-mj5z5
IP: 127.0.0.1
IP: 10.233.64.200
RemoteAddr: 10.233.64.1:58518
GET / HTTP/1.1
Host: 10.233.64.200
User-Agent: curl/7.29.0
Accept: */*
X-Real-IP
对于Nginx,在配置项中的设置:
proxy_set_header X-Real-IP $remote_addr; # 即IP3
proxy_set_header X-Forwarded-For $proxy_add_x_forwarded_for;
X-Real-IP 得到的是代理的 IP
X-Request-ID
在请求中,可以通过设置这个,给请求生成ID后,这个请求被转发后都带上这个ID,可以实现链路追踪,如Jager Tracing。社区有人通过做这个的操作:
https://kubesphere.com.cn/forum/d/2471-tracing/62
websocket要加Upgrade headers,如反向代理时,出现terminal无法打开的情况。Anyway one of these two protocols, SPDY or WebSockets, is required for communication with this endpoint, and the API will refuse requests without Upgrade headers. 对于k8s认证,api中Header中需要有
Authorization: Bearer <token>,Accept: */*, ‘application/json’
看下bookinfo相关的header
# curl -Ivv http://productpage.test.10.160.19.23.nip.io:32704/productpage?u=test
* About to connect() to productpage.test.10.160.19.23.nip.io port 32704 (#0)
*   Trying 10.160.19.23...
* Connected to productpage.test.10.160.19.23.nip.io (10.160.19.23) port 32704 (#0)
> HEAD /productpage?u=test HTTP/1.1
> User-Agent: curl/7.29.0
> Host: productpage.test.10.160.19.23.nip.io:32704
> Accept: */*
>
< HTTP/1.1 200 OK
HTTP/1.1 200 OK
< server: istio-envoy
server: istio-envoy
< date: Tue, 27 Oct 2020 09:30:37 GMT
date: Tue, 27 Oct 2020 09:30:37 GMT
< content-type: text/html; charset=utf-8
content-type: text/html; charset=utf-8
< content-length: 4183
content-length: 4183
< vary: Accept-Encoding
vary: Accept-Encoding
< x-envoy-upstream-service-time: 26
x-envoy-upstream-service-time: 26
< x-envoy-decorator-operation: kubesphere-router-test.kubesphere-controls-system.svc.cluster.local:80/*
x-envoy-decorator-operation: kubesphere-router-test.kubesphere-controls-system.svc.cluster.local:80/*

<
* Connection #0 to host productpage.test.10.160.19.23.nip.io left intact
通过KubeSphere的tracing页面查看product,通过Header解析出来的值:
node_id:sidecar~10.233.64.45~kubesphere-router-test-56bd997cbf-sbnd8.kubesphere-controls-system~kubesphere-controls-system.svc.cluster.local
http.status_code:200
http.protocol:HTTP/1.1
request_size:0
http.url:http://productpage.test.10.160.19.23.nip.io:32704/productpage?u=test
response_flags:-
response_size:0
peer.address:10.233.64.1
guid:x-request-id:5b167b72-3093-957d-bc0d-84349d75fec9
component:proxy
user_agent:curl/7.29.0
http.method:HEAD
upstream_cluster:inbound|80|http|kubesphere-router-test.kubesphere-controls-system.svc.cluster.local
downstream_cluster:-
span.kind:server
internal.span.format:zipkin
ip:10.233.64.45
参考
https://caicloud.io/blog/5e5cb029e7ea52002b5646ba
https://www.qikqiak.com/post/envoy-usage-demo/
https://www.envoyproxy.io/docs/envoy/v1.16.0/configuration/configuration#config
https://www.servicemesher.com/blog/thoughts-to-envoy-from-adn-perspective/