前言
-
官网: http://ansible-tran.readthedocs.io/en/latest/ Ansible默认通过 SSH 协议管理机器;安装Ansible之后,不需要启动或运行一个后台进程,或是添加一个数据库.只要在一台电脑(可以是一台笔记本)上安装好,就可以通过这台电脑管理一组远程的机器.在远程被管理的机器上,不需要安装运行任何软件,因此升级Ansible版本不会有太多问题;通常我们使用 ssh 与托管节点通信,默认使用 sftp.如果 sftp 不可用,可在 ansible.cfg 配置文件中配置成 scp 的方式.
-
安装
git clone git://github.com/ansible/ansible.git --recursive
cd ./ansible
source ./hacking/env-setup
#以下的Python模块也需要安装
pip install paramiko PyYAML Jinja2 httplib2 six
一旦运行env-setup脚本,就意味着Ansible从源码中运行起来了.默认的inventory文件是 /etc/ansible/hosts.inventory文件也可以另行指定
$ echo "127.0.0.1" > ~/ansible_hosts
$ export ANSIBLE_HOSTS=~/ansible_hosts
现在让我们测试一条ping命令:
ansible all -m ping --ask-pass
也可以使用apt安装最新版
配置PPA及安装ansible,执行如下命令:

$ sudo apt-get install software-properties-common
$ sudo apt-add-repository ppa:ansible/ansible
$ sudo apt-get update
$ sudo apt-get install ansible
你的第一条命令
现在你已经安装了Ansible,是时候从一些基本知识开始了. 编辑(或创建)/etc/ansible/hosts 并在其中加入一个或多个远程系统.你的public SSH key必须在这些系统的authorized_keys中:
192.168.1.50
aserver.example.org
bserver.example.org
配置免密登陆
-
方式一:用密码登陆
-
方式二:用证书配置免密
ssh-keygen #一直回车
ssh-copy-id -i ~/.ssh/id_rsa.pub user@目标主机ip  #ssh-copy-id将本地的公钥传输到远程主机的authorized_keys文件中
(也可以用  scp /root/.ssh/id_rsa.pub 目标IP:/root/.ssh/authorizedz_keys)
ssh user@目标主机ip #此时就可以直接登陆
若还是不行,请检查ssh的配置文件:
RSAAuthentication yes
PubkeyAuthentication yes
AuthorizedKeysFile .ssh/authorized_keys
.ssh目录下的各文件(.ssh目录权限700,authorized_keys权限600):
authorized_keys:存放远程免密登录的公钥,主要通过这个文件记录多台机器的公钥
id_rsa : 生成的私钥文件
id_rsa.pub : 生成的公钥文件
know_hosts : 已知的主机公钥清单
- 方式三:批量配置
如:现有一批机器的root的用户名密码,如何批量实现ansible主机与这批机器之间免密认证?
- ssh-keyscan 主机名 » /root/.ssh/know_hosts #两台远程主机的公钥记录加入本地known_hosts文件,实现登录不需要输入yes
- 通过用户和密码批量登录机器,
配置hosts文件,带密码参数ansible_ssh_pass
# cat hosts
[password]
10.58.8.1 ansible_ssh_pass=123456
10.58.8.2 ansible_ssh_user=weblogic ansible_ssh_pass=123456 ansible_sudo_pass=weblogic
这里面可以通过root用户和密码来登录10.58.8.1,其他像端口和用户等参数是默认的22和root;对于10.58.8.2则可以通过weblohic用户和密码来登录,但是roles目录下的yml文件,需要在全局指定sudo: yes
首先,需要用ssh-keygen来把远程主机的公钥来获取到本地;
ssh-keyscan10.58.8.110.58.8.2
/root/.ssh/known_hosts 把1和2两台主机加入本地known_hosts文件,实现登录不需要输入yes
然后,设置export ANSIBLE_HOST_KEY_CHECKING=False
现在需要通过playbook来实现批量对服务器设置免密码登录了,但是因为现在还没有配置秘钥,所有还得用密码登录,也就是在hosts文件里面对变量ansible_ssh_pass直接定义密码,当然如果所有机器的密码都一样的话,就不需要在hosts里面定义了,直接在命令行用-k参数来指定即可。
- 配置ssh-addkey.yml文件
# ssh-addkey.yml ---- - hosts: all gather_facts: no - name: install sshkey authorized_key: user=rootkey="" state=present - 运行ansible-playbook -i hosts ssh-addkey.yml
这样ansible的公钥就会批量记录到远程主机的authorized_key文件中,这个时候把hosts里面的关于密码的变量去掉,就可以实现免密码登录了。
注意,如果已经配置过免密登陆过,以后就不要再运行ssh-keygen了,否则之前所有的配置过免密登陆都会失效
ssh-agent 如果一个主机和若干个主机建立免密码登录后,在登录一台主机后,不能通过这台主机实现登录其他主机,也就是这些若干主机之间是无法相互登录的,可以通过转发来实现
我们假定你使用SSH Key来授权.为了避免在建立SSH连接时,重复输入密码你可以这么 做:
 $ ssh-agent bash  或者(ssh-agent bash --login -i)
 $ ssh-add ~/.ssh/id_rsa  #ssh-add命令是把专用密钥添加到ssh-agent的高速缓存中,如果不敲这条命令,则无法实现转发
 $ 配置/etc/ssh/ssh_config ForwardAgent yes
#然后执行ssh -A 主机1;ssh -A 主机2,就可以无限制跳转到需要登录的机器
ansible命令
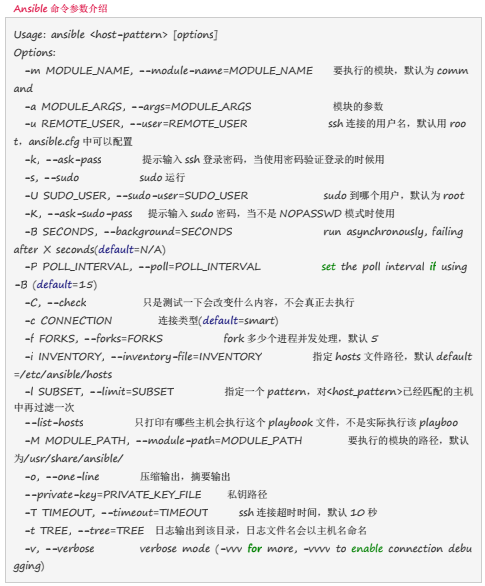
(根据你的建立方式,你也许希望使用Ansible的 –private-key 选项,通过指定pem文件来代替SSH Key来授权) 现在ping 你的所有节点:
$ ansible all -m ping
Ansible会像SSH那样试图用你的当前用户名来连接你的远程机器.要覆写远程用户名,只需使用’-u’参数. 如果你想访问 sudo模式,这里也有标识(flags)来实现:
# as bruce
$ ansible all -m ping -u bruce
# as bruce, sudoing to root
$ ansible all -m ping -u bruce --sudo
# as bruce, sudoing to batman
$ ansible all -m ping -u bruce --sudo --sudo-user batman
(如果你碰巧想要使用其他sudo的实现方式,你可以通过修改Ansible的配置文件来实现.也可以通过传递标识给sudo(如-H)来设置.) 现在对你的所有节点运行一个命令:
$ ansible all -a "/bin/echo hello"
Ansible1.2.1及其之后的版本都会默认启用公钥认证.
如果有个主机重新安装并在“known_hosts”中有了不同的key,这会提示一个错误信息直到被纠正为止.在使用Ansible时,你可能不想遇到这样的情况:如果有个主机没有在“known_hosts”中被初始化将会导致在交互使用Ansible或定时执行Ansible时对key信息的确认提示.
如果你想禁用此项行为并明白其含义,你能够通过编辑 /etc/ansible/ansible.cfg or ~/.ansible.cfg来实现:
[defaults]
host_key_checking = False
或者你也可以通过设置环境变量来实现:
export ANSIBLE_HOST_KEY_CHECKING=False
Inventory文件
Ansible 可同时操作属于一个组的多台主机,组和主机之间的关系通过 inventory 文件配置. 默认的文件路径为 /etc/ansible/hosts
/etc/ansible/hosts 文件的格式与windows的ini配置文件类似:
mail.example.com

[webservers]
foo.example.com
bar.example.com

[dbservers]
one.example.com
two.example.com
three.example.com
方括号[]中是组名,用于对系统进行分类,便于对不同系统进行个别的管理
一个系统可以属于不同的组,比如一台服务器可以同时属于 webserver组 和 dbserver组.
一组相似的 hostname , 可简写如下:
[webservers]
www[01:50].example.com
数字的简写模式中,01:50 也可写为 1:50,意义相同.你还可以定义字母范围的简写模式:
[databases]
db-[a:f].example.com
对于每一个 host,你还可以选择连接类型和连接用户名:
[targets]

localhost              ansible_connection=local
other1.example.com     ansible_connection=ssh        ansible_ssh_user=mpdehaan
other2.example.com     ansible_connection=ssh        ansible_ssh_user=mdehaan
所有以上讨论的对于 inventory 文件的设置是一种速记法,后面我们会讨论如何将这些设置保存为 ‘host_vars’ 目录中的独立的文件.
主机变量
前面已经提到过,分配变量给主机很容易做到,这些变量定义后可在 playbooks 中使用:
[atlanta]
host1 http_port=80 maxRequestsPerChild=808
host2 http_port=303 maxRequestsPerChild=909
组的变量
也可以定义属于整个组的变量:
[atlanta]
host1
host2

[atlanta:vars]
ntp_server=ntp.atlanta.example.com
proxy=proxy.atlanta.example.com
Playbooks
Playbooks 是 Ansible的配置,部署,编排语言.他们可以被描述为一个需要希望远程主机执行命令的方案,或者一组IT程序运行的命令集合.
简单来说,playbooks 是一种简单的配置管理系统与多机器部署系统的基础.与现有的其他系统有不同之处,且非常适合于复杂应用的部署.
Playbooks 可用于声明配置,更强大的地方在于,在 playbooks 中可以编排有序的执行过程,甚至于做到在多组机器间,来回有序的执行特别指定的步骤.并且可以同步或异步的发起任务.
示例
---
- hosts: webservers
  vars:
    http_port: 80
    max_clients: 200
  remote_user: root
  sudo: yes
  tasks:
  - name: ensure apache is at the latest version
    yum: pkg=httpd state=latest
  - name: write the apache config file
    template: src=/srv/httpd.j2 dest=/etc/httpd.conf
    notify:
    - restart apache
  - name: ensure apache is running
    service: name=httpd state=started
  handlers:
    - name: restart apache
      service: name=httpd state=restarted
      sudo: yes
      #你也可以登陆后,sudo 到不同的用户身份,而不是使用 root:
      sudo_user: postgres
如果你需要在使用 sudo 时指定密码,可在运行 ansible-playbook 命令时加上选项 –ask-sudo-pass (-K). 如果使用 sudo 时,playbook 疑似被挂起,可能是在 sudo prompt 处被卡住,这时可执行 Control-C 杀死卡住的任务,再重新运行一次.
执行一个 playbook
既然现在你已经学习了 playbook 的语法,那要如何运行一个 playbook 呢?这很简单,这里的示例是并行的运行 playbook,并行的级别 是10(译者注:是10个并发的进程?):
ansible-playbook playbook.yml -f 10
role
role的目录结构
site.yml
webservers.yml
fooservers.yml
roles/
    common/
        tasks/
        handlers/
        files/
        templates/
        vars/
        defaults/
        meta/
    webservers/
        tasks/
        defaults/
        meta/
main.yml file, which contains the relevant content:
tasks - contains the main list of tasks to be executed by the role.
handlers - contains handlers, which may be used by this role or even anywhere outside this role.
defaults - default variables for the role (see Using Variables for more information).
vars - other variables for the role (see Using Variables for more information).
files - contains files which can be deployed via this role.
templates - contains templates which can be deployed via this role.
meta - defines some meta data for this role. See below for more details.
注意,如果role中有main的,一般都会加载到play中
---
- hosts: webservers
  roles:
    - common
    - webservers
This designates the following behaviors, for each role ‘x’:

If roles/x/tasks/main.yml exists, tasks listed therein will be added to the play.
If roles/x/handlers/main.yml exists, handlers listed therein will be added to the play.
If roles/x/vars/main.yml exists, variables listed therein will be added to the play.
If roles/x/defaults/main.yml exists, variables listed therein will be added to the play.
If roles/x/meta/main.yml exists, any role dependencies listed therein will be added to the list of roles (1.3 and later).
Any copy, script, template or include tasks (in the role) can reference files in roles/x/{files,templates,tasks}/ (dir depends on task) without having to path them relatively or absolutely.
QA
- 对于role, meta有什么用?
指定依赖角色
https://docs.ansible.com/ansible/latest/user_guide/playbooks_reuse_roles.html